You may wish to refer to the Part 1 shopping list post.
In part 2 of this exploration we connected to and programmed an ESP8266 WiFi module from an Arduino Nano. In this part we will modify that solution to hold a static web page.
This is where things started getting tricky; most of the examples I found online either simply did not work, or worked very intermittently. The key problem was the attempts to connect to and set up the esp8266 connection automatically - what worked absolutely fine when I was typeing AT commands in just didn't like to work when I was sending the commands in code.
So, this may not be the right way, but it's a way which I have found works. Mostly. And at least when it doesn't it gives you a flashing light to tell you to hit restart!
The circuit is the same as last time but the code is substantially different. I based my code off of code produced by MJRobot which was the closest I could find to working.
I needed a number of subroutines.
doCommand() was designed to send a command to the esp8266, just as if you are sending an AT command. The problem was working out whether it worked, failed, or just needed a bit of time to sort itself out.
My method was to run the command as-is, guessing it would say "OK" when things work and something like "FAIL" when it didn't (both these strings being passed in as parameters). If it detected the "OK" it would return true. If it detected the "FAIL" string it would return false. If it didn't detect either, it would wait msdelay milliseconds and then try again.
If of course things went horribly wrong, I watched the serial monitor and adjusted the OK and FAIL strings checks accordingly :)
I've also included a debug flag which basically outputs all the serial data and a bit extra (eg some lines to split/combine the output) to enable you to figure out what's happening. This function would be a lot shorter without that!
Note I've not included a time-out. This is because at least for now I want it to just keep trying until something works! I may, or may not, add that at some point in the future.
bool doCommand(String command, String success, String failure, int msdelay, bool debug) {
  String s = "";
  char c = "";
  esp8266.write(command.c_str()); //write the command to the esp8266. Note this has to be a c_string.
  while (true) { //repeat forever (this is where the timeout would have to go I suppose)
    delay(msdelay); //wait a moment before carrying on
    while(esp8266.available()) //If the esp8266 has content
    {
      c = esp8266.read(); //read it
      if (debug) {
        Serial.write(c); //output if debug
      }
      s += c; //add to the received string
    }
    if (debug)
    {
      Serial.print("---");
      Serial.print(s);      //once we have a whole string, output it
      Serial.println("---");
    }
    if (s.indexOf(failure) > 0) //check if the failure string is found. This goes first as sometimes
    {                           //a 'false success' occurs (ie getting an IP address, it returns 0.0.0.0)
       if (debug)
       {
        Serial.println("Failure detected."); //output if debug
       }
      return false; //leave the loop
    }
    else
    {
     if (s.indexOf(success) > 0)//check if success string is found
     {
       if (debug)
       {
        Serial.println("Success detected."); //output if debug
       }
       return true; //leave the loop
     }
    }
  }
}
When the esp8266 receives a request from a web client, it gets a +IPD message which has a connection ID. I wrote a little helper to check if an +IPD had been received and return either the connection ID (-48 for some reason I don't understand but seems to work), or -1 if +IPD isn't found
int checkIfRequest()
{
  if (esp8266.available()) // check if 8266 is sending data
  {
    if (esp8266.find("+IPD,")) //+IPD code detected
    {
      delay(300); //Brief pause
      int connectionId = esp8266.read() - 48; //Get the ID (no idea why -48 but it works)
      return connectionId; //return the ID
    }
  }
  return -1; //Or return -1 if no request made
}
The act of building up and sending a web page is actually relatively complex. First we have to send an AT+CIPSEND command with the connect ID and the web page length. The OK message for this, weirdly, was keep-alix. I don't know who Alix... Actually I have a confession to make; it awas keep-alix on my first esp8266, on this one which I'm using to test for you lot it comes back as keep-alii. Now I can't pretend to know why this is - but the keep- bit seems stable so I adjusted the code to just use that. Learning on the fly! Then we have to send the webpage data itself. Then we have to send an AT-CIPCLOSE command, again including the connection ID. I thought it best to make a little helper function to do this.
void sendWebpage(int connectionId,String webpage)
{
      String cipSend = "AT+CIPSEND="; //Build up the initialisation string
      cipSend += connectionId;
      cipSend += ",";
      cipSend += webpage.length();
      cipSend += "\r\n";
      doCommand(cipSend,"keep-","FAIL",1000,true); //Send initialisation
      doCommand(webpage,"OK","FAIL",1000,true); //Send the webpage
      String closeCommand = "AT+CIPCLOSE="; //Build up the close string
      closeCommand += connectionId; // append connection id
      closeCommand += "\r\n";
      doCommand(closeCommand,"OK","FAIL",1000,true); //Send the close string
}
A few initialisation things at the top. You may notice I've changed to using esp8266 rather than ESPSerial. I don't really know why... but the same pins for the Rx/Tx, speed is set as a constant so we can change in future if we want, and I have included a DEBUG constant that can be used to turn on global debugging (which, if turned off, can be overruled with an 'or true' in the function calls).
#include <SoftwareSerial.h>
SoftwareSerial esp8266(2, 3); // RX | TX

#define speed8266 9600
#define DEBUG false

bool ipFail;
Then, the setup! This basically runs through the AT commands we did before, and again while they worked perfectly typed in manually, I find these often go wrong. Hence all this palaver (and this is days of experimentation - you're welcome!)
The one thing that can go wrong is the IP address. If it comes back as 0.0.0.0 then it's a problem - and in the loop I make the LED flash. You need to restart the Arduino. I suppose I could set a loop to check it and run the process again but I'm still learning about this and may come up with a way to stop it happening in the first place. If I have to reset occassionally it will annoy me and I'm more likely to remember to fix it!
void setup()
{
  pinMode(LED_BUILTIN, OUTPUT); //use the built in LED
  esp8266.begin (speed8266);  //set the speed
  Serial.begin(speed8266); //open the serial monitor
  Serial.println("ESP8266 Static Web Server"); //
  Serial.println("Waiting 1 s");
  delay(1000); //Get ready...
  Serial.println("Connecting to network and waiting 1 second.");
  doCommand("AT+CWJAP=\">>YOUR NETWORK SSID<<\",\">>YOUR PASSWORD<<\"\r\n","OK","FAIL",1000,DEBUG or true);
  Serial.println("Changing mode and waiting 1 second.");
  doCommand("AT+CWMODE=1\r\n","OK","FAIL",1000,DEBUG or true);
  Serial.println("Showing IP and waiting 1 second.");
  //The next line logs ipFail as to whether 0.0.0.0 was returned (a fail)
  //later on we'll have the LED flash if this is the case and you have
  // to restart the Arduino
  ipFail = not doCommand("AT+CIFSR\r\n","CIFSR","0.0.0.0",1000,DEBUG or true);
  Serial.println("Enabling multiple connections and waiting 1 second.");
  doCommand("AT+CIPMUX=1\r\n","OK","FAIL",1000,DEBUG or true);
  Serial.println("Starting comm port 80 and waiting 1 second.");
  doCommand("AT+CIPSERVER=1,80\r\n","OK","FAIL",1000,DEBUG or true);
  Serial.println("Entering loop.");
}
Now, finally, the main loop! First we check whether an IP address was received, and flash if there's a problem or just turn on if OK. We check if there's a request, and if so build and send the webpage.
void loop()
{
  if (ipFail) //If the IP came back as 0.0.0.0 then we flash the LED
  {
    digitalWrite(LED_BUILTIN, HIGH);
    delay(500);
    digitalWrite(LED_BUILTIN, LOW);
    delay(500);
  }
  else
  {
    digitalWrite(LED_BUILTIN, HIGH); //If not, just turn the LED on solid
    //so we know things are good to go.
      while(esp8266.available())
      {
        Serial.write(esp8266.read()); //Get any data from the ESP and echo it
      }
      while(Serial.available())
      {
        esp8266.write(Serial.read()); //Get any data on monitor and send it back
      }
      int connectionId = checkIfRequest(); //Check if we've received a web request
      if (connectionId != -1)
      {
        //build the webpage
        String webpage = "<html><head><title>Testing!</title></head>";
        webpage += "<body><h1>Testing!</h1><p>Hello, world!</p></body></html>";
        sendWebpage(connectionId,webpage); //Send the webpage
      }
   }
}
Now of course, you could be a tad lazy and access the whole file here. However, I'm a big fan of typing code, I feel it helps you learn.
The first time I ran this, I got the following:
ESP8266 Static Web Server
Waiting 1 s
Connecting to network and waiting 1 second.
AT+CWJAP=">>YOUR NETWORK SSID<<",">>YOUR PASSWORD<<"

busy p..---AT+CWJAP=">>YOUR NETWORK SSID<<",">>YOUR PASSWORD<<"

busy p..---
---AT+CWJAP=">>YOUR NETWORK SSID<<",">>YOUR PASSWORD<<"

busy p..---
---AT+CWJAP=">>YOUR NETWORK SSID<<",">>YOUR PASSWORD<<"

busy p..---
---AT+CWJAP=">>YOUR NETWORK SSID<<",">>YOUR PASSWORD<<"

busy p..---
---AT+CWJAP=">>YOUR NETWORK SSID<<",">>YOUR PASSWORD<<"

busy p..---
---AT+CWJAP=">>YOUR NETWORK SSID<<",">>YOUR PASSWORD<<"

busy p..---
+CWJAP:1

FAIL
---AT+CWJAP=">>YOUR NETWORK SSID<<",">>YOUR PASSWORD<<"

busy p..+CWJAP:1

FAIL
---
Failure detected.
Changing mode and waiting 1 second.
AT+CWMODE=1


OK
---AT+CWMODE=1


OK
---
Success detected.
Showing IP and waiting 1 second.
AT+CIFSR

+CIFSR:STAIP,"0.0.0.0"
+CIFSR:STAMAC,"5c:cf:7f:49:d---AT+CIFSR

+CIFSR:STAIP,"0.0.0.0"
+CIFSR:STAMAC,"5c:cf:7f:49:d---
Failure detected.
Enabling multiple connections and waiting 1 second.
AT+CIPMUX=1


OK
---AT+CIPMUX=1


OK
---
Success detected.
Starting comm port 80 and waiting 1 second.
AT+CIPSERVER=1,80


OK
---AT+CIPSERVER=1,80


OK
---
Success detected.
Entering loop.
Obviously my debug code could be made a bit more succinct, but it does the job. More importantly, I didn't change my SSID/Password...
The second time I remembered (and no, that's not my password!) and everything seems fine:
ESP8266 Static Web Server
Waiting 1 s
Connecting to network and waiting 1 second.
AT+CWJAP="GDog","MyPa$$w0rd"

---AT+CWJAP="GDog","MyPa$$w0rd"

---
---AT+CWJAP="GDog","MyPa$$w0rd"

---
---AT+CWJAP="GDog","MyPa$$w0rd"

---
---AT+CWJAP="GDog","MyPa$$w0rd"

---
---AT+CWJAP="GDog","MyPa$$w0rd"

---
WIFI CONNECTED
---AT+CWJAP="GDog","MyPa$$w0rd"

WIFI CONNECTED
---
---AT+CWJAP="GDog","MyPa$$w0rd"

WIFI CONNECTED
---
---AT+CWJAP="GDog","MyPa$$w0rd"

WIFI CONNECTED
---
---AT+CWJAP="GDog","MyPa$$w0rd"

WIFI CONNECTED
---
---AT+CWJAP="GDog","MyPa$$w0rd"

WIFI CONNECTED
---
WIFI GOT IP
---AT+CWJAP="GDog","MyPa$$w0rd"

WIFI CONNECTED
WIFI GOT IP
---

OK
---AT+CWJAP="GDog","MyPa$$w0rd"

WIFI CONNECTED
WIFI GOT IP

OK
---
Success detected.
Changing mode and waiting 1 second.
AT+CWMODE=1


OK
---AT+CWMODE=1


OK
---
Success detected.
Showing IP and waiting 1 second.
AT+CIFSR

+CIFSR:STAIP,"192.168.1.139"
+CIFSR:STAMAC,"5c:cf:7---AT+CIFSR

+CIFSR:STAIP,"192.168.1.139"
+CIFSR:STAMAC,"5c:cf:7---
Success detected.
Enabling multiple connections and waiting 1 second.
AT+CIPMUX=1


OK
---AT+CIPMUX=1


OK
---
Success detected.
Starting comm port 80 and waiting 1 second.
AT+CIPSERVER=1,80

no change

OK
---AT+CIPSERVER=1,80

no change

OK
---
Success detected.
Entering loop.
Shall we test it? Let's grab that IP address and put it into a browser window...
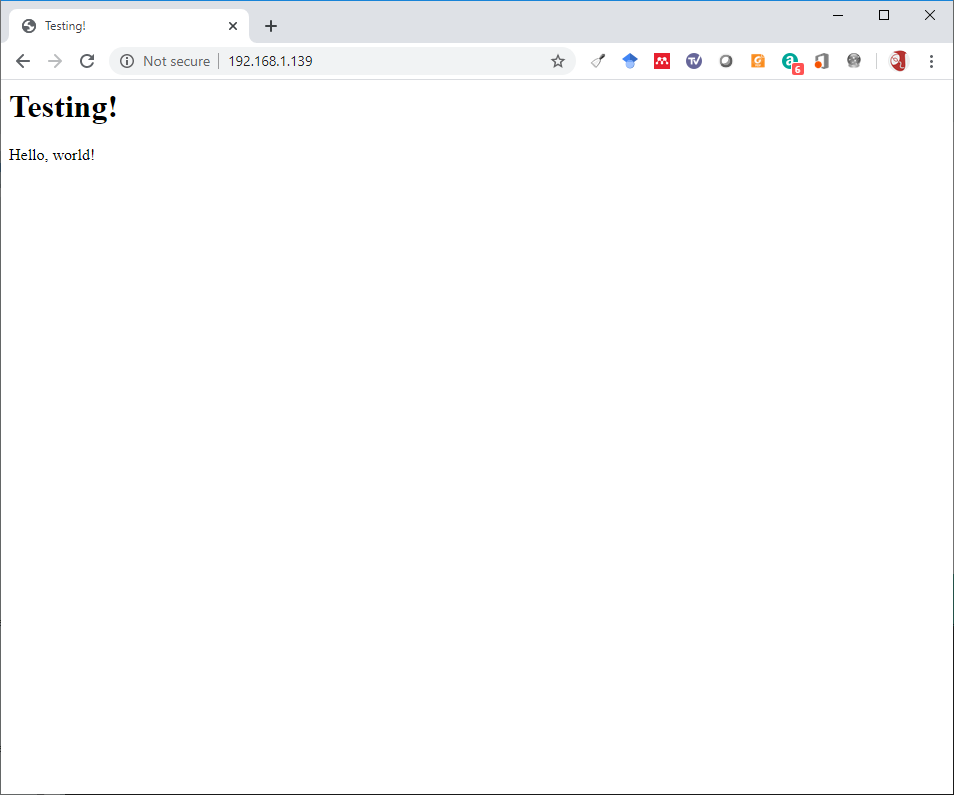
Well that looks good! The code below shows what came over the monitor.
,433:GET / HTTP/1.1
Host: 192.168.1.139
Connection: keep-alii---,433:GET / HTTP/1.1
Host: 192.168.1.139
Connection: keep-alii---
Success detected.

Recv 99 bytes

SEND OK
---
Recv 99 bytes

SEND OK
---
Success detected.
AT+CIPCLOSE=0

0,CLOSED

OK

+IPD,1,361:GET /favicon.ico H-Language: en-GB,en-US;q=0.9,en;q=0.8

---AT+CIPCLOSE=0

0,CLOSED

OK

+IPD,1,361:GET /favicon.ico H-Language: en-GB,en-US;q=0.9,en;q=0.8

---
Success detected.
Of course, we could (should?) do some filtering of the GET string, return 404 errors or whatever for the favicon.ico and such like. But this is just playing, I'm not trying to write an Arduino-based Apache server!
There we go then - no wiring up this time, but we've got WiFi and made a very basic web server! On to the next tutorial I suppose...